
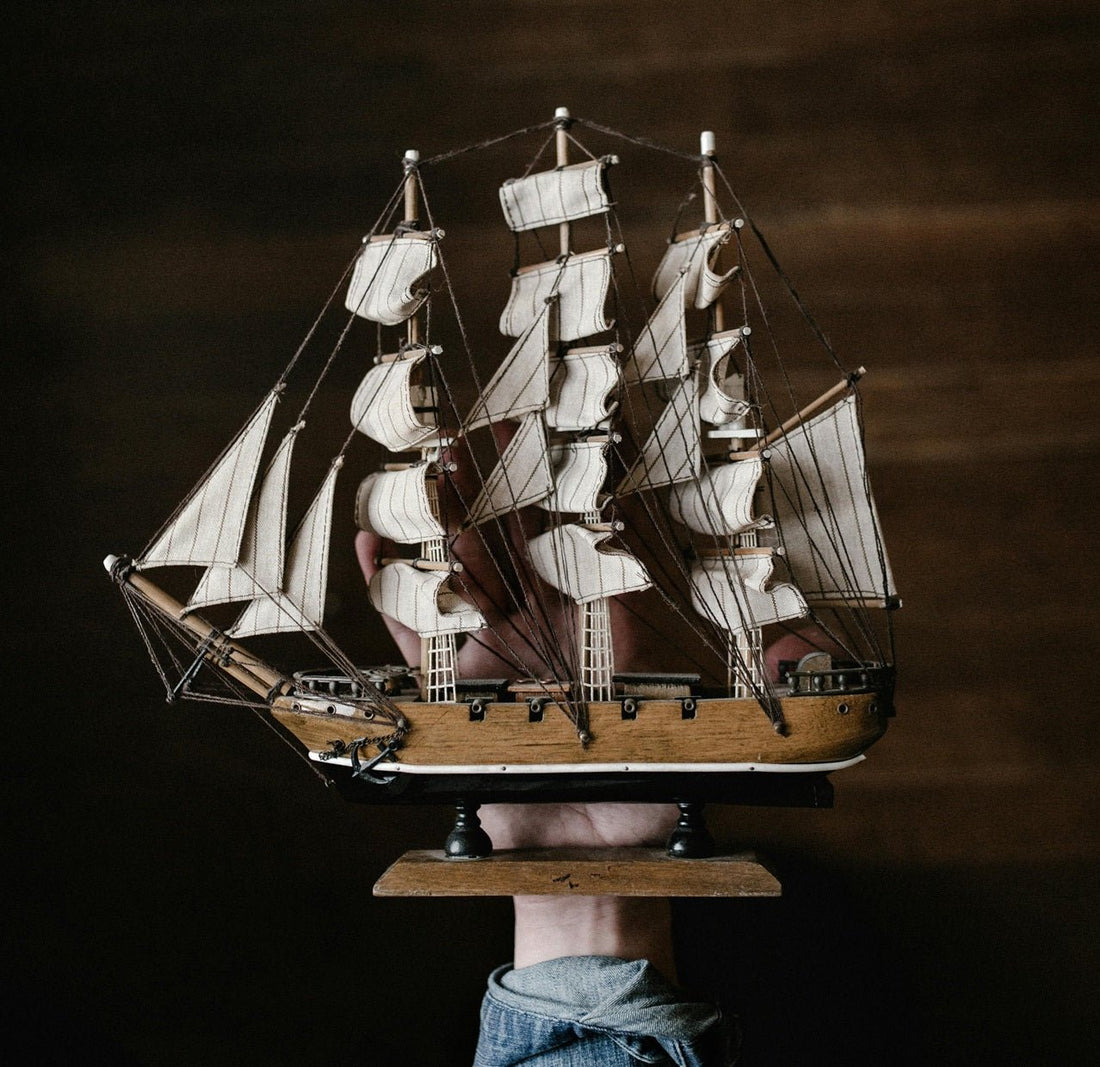
Why Build a Wooden Ship Model?
Building a wooden ship model is a test of patience, focus, and dedication. I aim to guide both beginners and seasoned hobbyists. A completed scale ship model reflects the effort and persistence of its builder. It can take dozens or even hundreds of hours. You’ll feel pride when you nail a tricky section and frustration when a detail goes wrong. These emotional highs and lows are part of the journey.
The real “tool” behind any great model isn’t metal or plastic; it’s the modeler’s commitment. Dedication drives success in this hobby. In this guide, we’ll walk you through each step. You’ll learn which tools to pick, how to set up a workspace, and how to pick the right wooden ship modeling kit. Our goal is simple: get you spending more time displaying your finished model than struggling to build it.
Modeling a wooden ship is also a great family activity. Invite your partner, kids, or friends to help. Sharing the task helps pass the craft to the next generation and makes the project more enjoyable.
Choosing the Right Wooden Ship Model Kit
The first decision is what ship to build. This choice applies whether you’re new or experienced in ship modeling. Base your choice on what excites you. You should enjoy the design and plan to feel satisfied when it’s done.
Ask yourself a few simple questions before buying:
1. How much are you willing to spend?
2. What is your experience level in ship modeling?
3. What kind of workspace do you have?
4. What type of ship are you drawn to?
5. How many hours a week can you dedicate?
Choose something challenging, but not overwhelming. For beginners, avoid advanced models with complex rigging and multiple decks. These can stall your progress and hurt motivation. Instead, go for a small, simple kit. Think of a boat with one deck and one or two masts. Limit the rigging to basic steps.
Finally, set a budget. Beginner wooden ship kits should cost under $150. This helps you learn the ropes without a big investment. As you build confidence, you can move on to more intricate models.
Inspect Kit Quality: Parts and Plans Matter
When you open a wooden ship model kit, you don’t need expert knowledge to judge its quality. First, check that every item on the parts list is included. Wooden strips, pre-cut pieces, metal fittings, and rigging materials should all be present and well-crafted.
Next, inspect the kit’s plans and instructions. The plans are the drawings showing each assembly step, with clear numbering and labels. Look for precision in the lines and measurements. Good instructions, whether text, icons, or diagrams, are easy to follow and tied to the drawings. Whether the kit has plain text or a fully illustrated guide, clarity here can determine whether you feel confident or frustrated as you build.
Choose the Right Hull Type
Wooden ship models come with three hull styles. One-piece, solid hulls are pre-built and don't teach you hull construction. Frame-and-planking hulls, with laser-cut frames and wooden strips, give you hands-on experience shaping and fitting planks. Some kits use large hull sections mounted on a frame; this reduces planking work but still lets you shape and finish the hull. For beginners, frame-and-planking kits strike the best balance between challenge and achievable results.
Buying Modeling Tools: Invest in Quality
Tools matter. A good tool can make your job easier, keep your parts accurate, and let you enjoy building. Cheap tools can slow you down and lead to mistakes. Here’s what to consider, broken down by skill level.
Tools for Beginners
You need a core toolkit to start. This includes various pliers for bending and cutting wire, a small ball-peen hammer, saws, chisels, cutters, files, and drill bits. A plank bender helps shape wood. Rasp, tweezers, and an awl are handy for detail work. Rules, bevels, compass, clamps, vise, and glue (either superglue or wood glue) are essential. You also need sandpaper, sanding blocks, brushes, a metal brush for cleaning parts, scissors, a small nailer, and finishing nails or pins.
Tools for Intermediate Builders
Once you move past beginner kits, your toolkit should grow. An electric drill with variable speed lets you bore clean holes. A soldering iron helps with metalwork. A miter box gives accurate angled cuts. Rotary tables help with curved cuts. A waterline marker ensures accurate painting guides. Bench vises, LED magnifiers, hull supports, and templates aid precision. For rigging, you’ll need specialized guides and small clamps for steady tightening.
Expert Tools for Advanced Builds
If you’re building from scratch or working at scale, your workshop should include electric bench sanders, grinders, and a lathe. A mini vacuum keeps things clean. For intricate wood cutting, a marquetry saw and electric disc saws help. Micro tools like tiny saws, scrapers, rulers, and shaping tools give you detailed control over fine parts. These tools demand skill and space, but they let you build highly detailed, professional-level models.
Setting Up Your Ship Modeling Workshop
Creating a functional workshop is key before you start building your wooden ship model. Ideally, your workspace should be roomy enough to handle different ship sizes and host all your tools. A clear, uncluttered table helps you work with precision and focus.
First, plan storage that keeps your parts and tools within easy reach. Drawers are essential for storing small items like drill bits, blades, and tiny model components. You can place these drawers at the ends or the back of your workbench. If drawers are not an option, consider getting a Compact Modeler Workbench and a dedicated Paints Organizer to keep everything neatly arranged.
Organize your power outlets so they’re within easy reach of your workspace. Use a power strip with an on/off switch so you can safely disconnect tools when you’re done. Always lay out the plugs in front so cables don’t tangle or restrict movement. Above your build area, hang printed assembly plans or photos of your model. This way, you can glance at the instructions without interrupting your workflow.
Protect your work surface with self-healing cutting mats. Depending on your project size, choose from A2, A3, or A4 mats. These mats save your table from scratches and gouges from knives and tools.
Good lighting is crucial for ship modeling. Plan to install two 12-watt white LED ceiling lights to evenly illuminate your workspace. For detailed work, use a desk lamp with a magnifying glass - ideally one that offers around 2 to 5 watts of LED light and at least three levels of magnification. This setup helps you see fine details clearly.
Ventilation should not be overlooked. You’ll likely use adhesives like cyanoacrylate, white glue, varnish, paint, and solvents. If your workspace is not near a window, add a fan or an exhaust system like the ones used in bathrooms. This keeps fumes from concentrating in the room and helps maintain air quality.
If your workspace is part of a shared living space, consider installing a small utility sink. It allows you to rinse brushes and clean tools without infringing on the kitchen or bathroom. This practical addition helps maintain cleanliness and keeps your modeling area separate.
Finally, mount a tool board or pegboard on the wall facing your workspace. Hang your most-used tools there so they’re simple to locate. A well-arranged display helps you stay organized, speeds up your workflow, and lets you keep your eyes on the build at all times.
By thoughtfully organizing your workshop, you create a place that supports your work and respects your space. With good storage, lighting, ventilation, and tool layout, you’re ready to jump into shipbuilding and enjoy every step of the process.
Ship Hull Construction
After setting up your workshop and gathering your tools, you're ready to start building the hull of your wooden ship model. This guide will walk you through every stage of hull construction. First, we’ll cover kit inspection and familiarization. From there, we move into assembling the keel and frames. Finally, we guide you through adding the deck and preparing the masts. These steps take you from raw parts to a solid hull structure.
Begin with Kit Inspection and Preparation
Start by unpacking the kit and laying everything out in your workspace. Study each part closely to recognize shapes and sizes. Most wooden ship model kits include a parts list; use it to verify that each piece is included. Some also offer digital instructions in PDF form or video tutorials. Reviewing these materials before you begin will clarify the steps and build confidence before cutting into wood.
Assemble the Keel and Frames
Once you've confirmed all parts are intact, start with the keel. This long, central piece runs from the bow to the stern along the middle of the model. It forms the backbone of your ship. Everything else attaches to it.
Position your printed assembly diagrams clearly in front of you so you can reference them constantly. With the keel in place, check each frame piece to ensure none are cracked or warped. Fit each frame to the keel following the diagram. Accuracy here determines how straight your hull will be. Take your time and check alignment often.
Fit the Deck and Mount the Masts
After the keel and frames are secured, it’s time to add the deck. The deck reinforces the keel and helps square up the frames. Most beginner kits come with a single deck layer, easing this step. Hold the deck gently in place; never force it onto the frames. Applying too much pressure can bend or weaken the structure. If it doesn’t fit smoothly, check your frame alignment and make subtle adjustments.
Once the deck fits evenly, prepare mounting points for the masts if your kit includes them. The deck should sit flush and straight before moving on, or the masts may lean or cause stress elsewhere.
Assembling the Bow and Stern on a Wooden Ship Model
Start by fitting the bow and stern sections. These pieces are crucial; they form the strong foundation for the wooden planks that will cover the hull. Check that each frame aligns symmetrically and matches the curvature of your hull design. Lay the frames in place, ensuring the decks aren’t bowed or sagging. Once everything is correctly lined up, use cyanoacrylate adhesive formulated for wood. This glue dries fast, but to ensure a solid bond, let the assembly sit undisturbed for at least 24 hours. In our next post, we’ll walk through further stages of hull construction.
Covering the Ship Hull: First Layer of Planking
Before applying planks, smooth the squared-off edges of the frames to help the wood strips fit the curved hull form. A sanding block and sandpaper will do the trick. Next, prepare the deck by gluing down your wood veneer. You can select from dense cyanoacrylate glue with a spray accelerator or traditional white wood glue. Some builders prefer using tiny nails with a magnetic nailer and modeler’s hammer. Choose the method that matches your kit’s design or your own style.
After the deck is secure, it’s time to plank the hull with the first layer of wooden strips. To bend these planks smoothly around your hull, use an electric plank bender tool, heating them after soaking in water for about 30 minutes. If you don’t have an electric tool, a manual plank bender works just as well.
Once the first layer is set, mark out the cannon ports using a template. This ensures even spacing across the hull. You’ll need tools like a drill, a hobby knife, and a file to cut and refine the openings cleanly.
Applying the Second Veneer Layer
With the first planking done, proceed with a second layer of thin wooden veneer over the hull. This additional layer smooths out seams and strengthens the hull, giving it a refined finish.
Sanding and Varnishing the Completed Hull
When your double-layered planks are fully in place, gently sand the entire hull to smooth out any imperfections. Then apply varnish to seal and protect the wood. Depending on your ship kit design, you may choose to paint parts of the hull with a brush for color accents or a specific style. With the hull complete and dried, your model is ready for the next step: rigging installation.
Ship Model Rigging
When we talk about rigging a wooden ship model, we're referring to adding all the sails and rigging lines that define a vessel’s shape and function. Whether building a simple sailboat, a caravel, a galleon, or any other rigged ship model, the same step-by-step process applies. Below, you’ll find each essential stage to follow for accurate, stable rigging of your scale model.
Step 1: Installing Fairleads, Bitts, and Chainplates
Start by attaching the fairleads, bitts (pin racks), and chainplates to the hull. These parts anchor your rigging lines and ensure the model holds tension properly. Once these are in place, drill holes in the bitts to insert and secure the belaying pins. Paint these elements ahead of time to simplify the process. Next, add the deadeyes to the chainplates. These help hold the shrouds (the lines supporting the masts) and their lanyards, which maintain tension and keep the mast upright.
Step 2: Assembling and Installing the Masts
After setting up your base fittings, assemble the masts, including the bowsprit, and fit their tops. Prepare all cross spars: yards, booms, and gaffs. Once built, insert the masts into the deck. Models with holes designed for the masts give the most accurate fit and alignment. Now, begin securing the masts with stays. For the foremast and mainmast, tie stays from below their tops to the bowsprit. The mizzen mast gets stays tied to the base of the mainmast. Add additional stays from the top crosstrees of the fore and main masts; one set to the bowsprit and another to the foremast.
Step 3: Building the Standing Rigging - Shrouds
Once the mainstays are in place, focus on the shrouds. Build the deadeyes and lanyards, then secure them to the deck using chainplates. Install each shroud one at a time, alternating sides to maintain mast stability. After attaching all shrouds, add ratlines (the horizontal ladder-like ropes between shrouds). Use small clamps on each side of the shrouds to hold them steady while you rig ratlines evenly.
Step 4: Attaching the Bowsprit and Jib-boom Rigging
With the shrouds and ratlines secure, fix the jib-boom to the bowsprit, straining it with its own set of lines. Repeat this for any bowsprit standing rigging, ensuring tight, straight tension. Again, clamps or slow, methodical steps help keep alignment precise.
Step 5: Adding the Running Rigging and Sails
Now that all standing rigging is complete, move on to running rigging and sails. Begin with the mizzen mast’s lateen sail. Next, rig the spritsail on the bowsprit. Continue with the staysail and fore top sail. Attach the mainsail and main topsail. Finally, install the bowlines (ropes at the bow used on square-rigged vessels to pull the sail edges forward when sailing close to the wind). With these complete, your model’s rigging is fully in place and functional.
Final Steps in Assembling a Wooden Ship Model
After building the hull and finishing the rigging, the last part of the ship model build is applying the finishing touches. This includes assembling or placing the lifeboat (also called a shallop if your kit includes one), painting, and adding details like the anchors and flags. You’ll also need to attach any other final elements included in your kit.
If your kit comes with a pre-built lifeboat, you’ll just need to smooth out any rough edges using a carving knife or file. After that, paint it and mount it in place on the ship. Some kits require you to build the lifeboat from scratch. In that case, it adds another layer of work and gives you a fresh challenge.
If building the lifeboat yourself, make sure each frame lines up correctly with the keel before gluing. Cover the frame edges with masking tape to protect them during handling. Add a strip across the frames to act as a temporary brace. This will help hold everything together as you shape and place the strips that form the hull. Use a double-planking method. The second layer will help correct any flaws from the first one. Once the second layer is complete, remove the internal supports and sand the inside of the lifeboat until smooth.
As for the anchors, their placement has changed over time. In earlier periods, they were tied to the outside of the hull. Later ship designs stored anchors inside the vessel. Where and how you place the anchors on your model will depend on the historical era of the ship you're building.
How to Finish a Wooden Ship Model with Paint or Varnish
To give your model a clean, realistic look, you’ll need to choose how to finish the wood. Some modelers keep the natural wood exposed. Others paint the whole ship. There’s also a middle approach where the upper hull stays bare while the lower hull gets painted.
For older ship designs, avoid glossy finishes. Use matte acrylic varnish. Apply one coat and let it dry fully. Then lightly sand it with fine-grit sandpaper. Add a second coat and sand again. You can also use acrylic-based varnish that adds a slightly darker tint and extra protection. For modern ship models, using a medium-gloss acrylic varnish is acceptable.
If you decide to paint the hull, prep the surface first. Use a trowel to apply acrylic putty into any small holes or uneven areas. Let it dry, then sand those spots until smooth. This gives you a clean base for your paint.
Always use acrylic or water-based paints. Oil-based paints should only be used on small metal parts. To get the best finish, apply your paint with an airbrush. This gives you better control and smoother coverage, especially on detailed sections.
Installing Flags, Banners, and the Base
Ship model kits usually include printed flags and banners. All you need to do is cut them out and attach them to the correct locations on the ship. Follow the placement instructions in your kit for accuracy.
Lastly, prepare and attach the metal nameplate if your kit includes one. Mount the finished model on its display base. With everything in place, the hull, rigging, lifeboats, anchors, flags, and paint or varnish, your wooden ship model is now complete and ready for display.
By following these steps, from picking the right kit to setting up your space, you’ll turn your wooden ship model dream into reality. Enjoy the process, share it with loved ones, and keep sailing toward more ambitious projects.

